Best Nox, MEmu and MuMu Settings, Compared
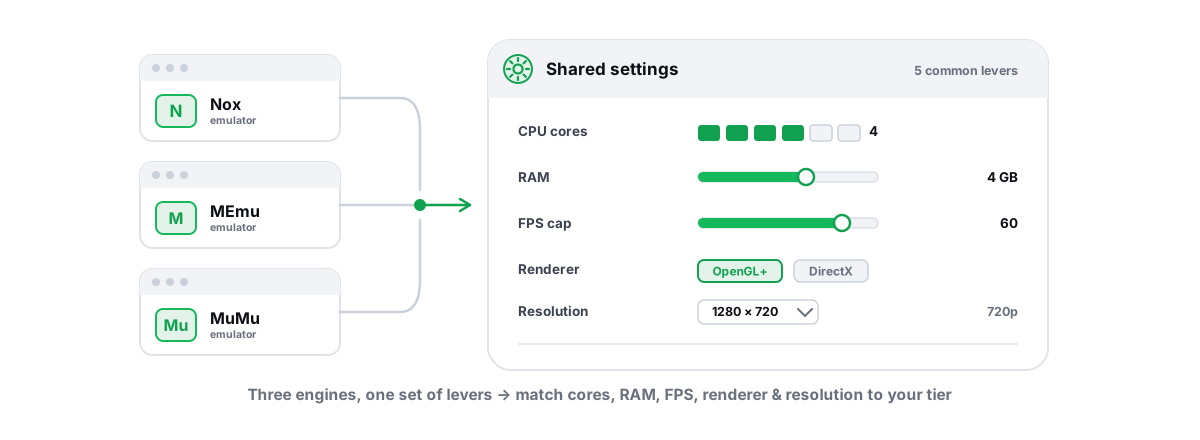
GameLoop, BlueStacks and LDPlayer get most of the attention, but Nox, MEmu and MuMu run plenty of Android games well once you set them up right. The best Nox, MEmu and MuMu settings come down to the same five levers on all three, plus a few per-emulator quirks that trip people up. Here is what actually moves performance, and what is a waste of time.
The three emulators and what they share
Nox Player, MEmu and MuMu Player are all Android emulators that run a full virtual machine on top of Windows. That matters because every one of them depends on the same handful of underlying levers, regardless of which menu wraps them.
An emulator is a VM. It boots an Android image, hands it virtual CPU cores and a slice of your RAM, and renders the screen through a graphics translation layer (OpenGL, DirectX or Vulkan) back onto your GPU. When one of these runs badly, the cause is almost always one of four things: virtualization is off in BIOS, the core/RAM split is wrong, the renderer is mismatched to your GPU, or the frame cap is fighting your refresh rate.
Get those right and all three behave. The rest is per-app trivia. The shared levers come first, because that is where the real gains live.
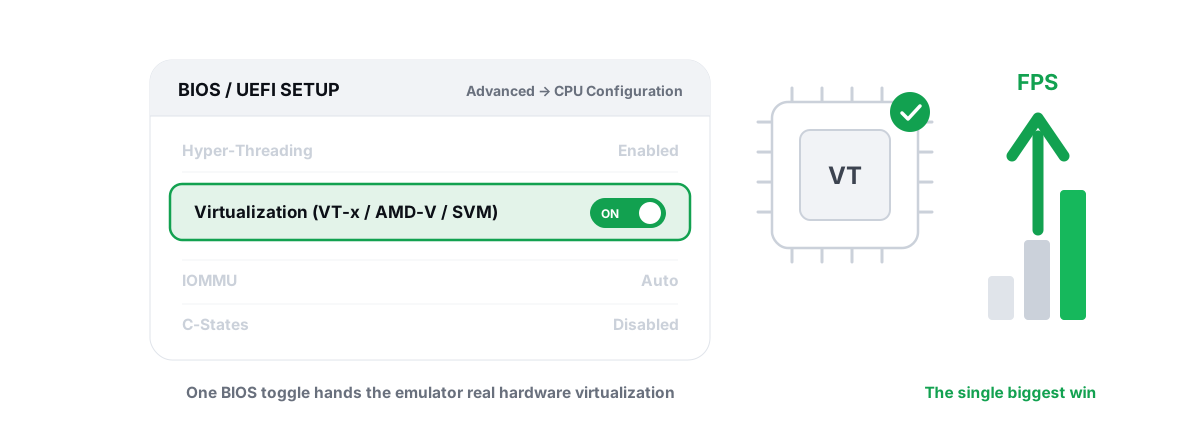
If you only do one thing, enable CPU virtualization in your BIOS. It is the single biggest performance change available to any Android emulator, and no in-app setting comes close.
The best Nox, MEmu and MuMu settings: the five shared levers
Virtualization (VT-x / AMD-V / SVM)
Without hardware virtualization, the emulator falls back to software translation and runs several times slower, with constant stutter and high CPU. All three will warn you, but the warning is easy to miss.
Enable Intel VT-x or AMD SVM Mode (AMD-V) in your BIOS/UEFI. On many boards it ships off. If Windows has Hyper-V, the Virtual Machine Platform, or Core Isolation memory integrity turned on, the emulator can be locked out of hardware acceleration even when BIOS is correct — those Windows features claim the virtualization layer first. The full walkthrough is in enabling VT-x and AMD-V for emulators.
CPU cores and RAM
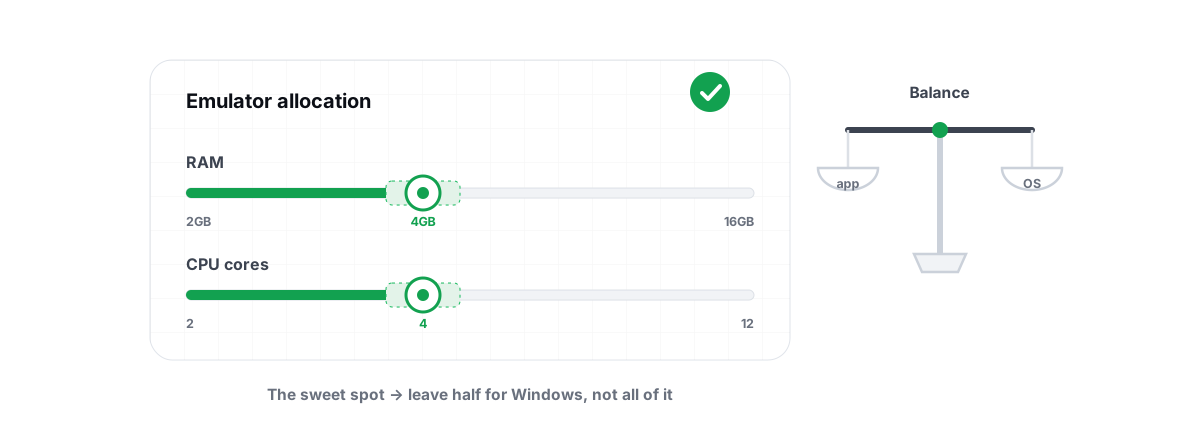
The instinct is to assign every core and half your RAM. Don't. The VM has overhead, and starving Windows and your background apps causes more stutter than it cures.
A sane starting point on most machines: assign half your physical cores and 4 GB of RAM to the emulator. On a 6-core/12-thread CPU like a Ryzen 5 2600, 4 cores and 4 GB is a good balance. Go higher only if you have headroom — 8 GB to the emulator makes sense on a 16 GB machine, not an 8 GB one. There is a fuller breakdown of the math in how many cores and how much RAM an emulator actually needs.
Past a point, more cores give nothing back, because mobile games rarely scale beyond a few threads. You just pay VM overhead for cores the game never touches.
Renderer (OpenGL / DirectX / Vulkan)
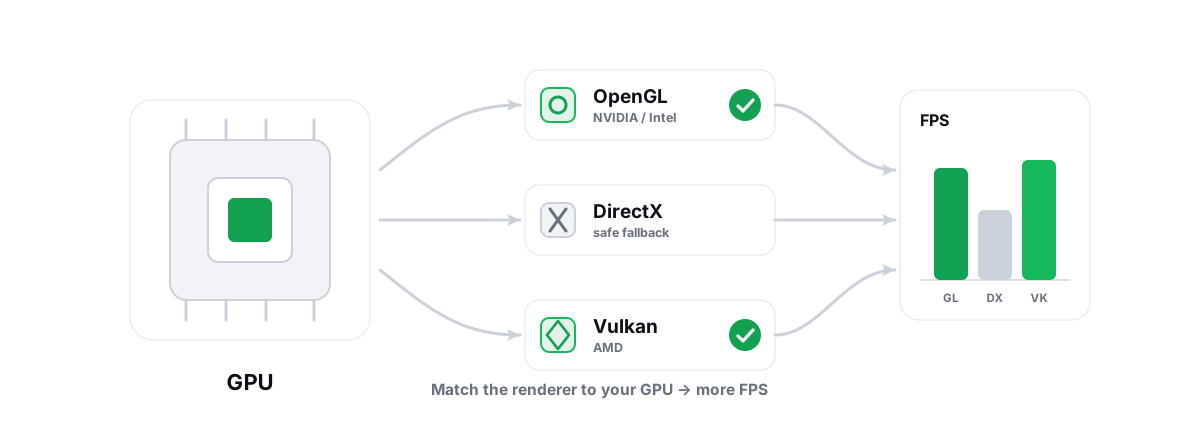
The renderer is the translation layer between Android's graphics calls and your GPU. The right choice depends on your GPU vendor and the specific game, and there is no universal winner — which is exactly why you test rather than trust a forum post. The trade-offs are covered in depth in choosing OpenGL vs Vulkan for emulators.
As a sane default by GPU vendor:
- NVIDIA — OpenGL or DirectX usually behave best. Vulkan can work but is hit-or-miss depending on the emulator's implementation.
- AMD — Vulkan is often the smoother path when the emulator offers it.
- Intel (iGPU or Arc) — OpenGL tends to be the safe, compatible choice.
Switch renderer, restart the emulator, run the same scene, and watch the FPS and frametime. If you see compatibility glitches — black textures, flicker — back off to OpenGL. A renderer that benchmarks fast but renders wrong is not actually the fastest.
Frame cap and refresh rate
All three let you set a max FPS. Cap it at or just below your monitor's refresh rate — 60 on a 60 Hz panel, 120 or 144 if your display and the game support it. A 240 FPS cap on a 60 Hz monitor just burns GPU power and heat for frames you never see, and can introduce tearing.
A high cap is not magic either. The game still has to be capable of rendering that many frames, and many mobile titles are internally locked. Asking for 120 in a game hard-capped at 60 changes nothing.
Resolution and DPI
Match the internal resolution to how you actually play. A phone-style portrait resolution for a portrait game, 1920x1080 for a landscape one. Rendering at a higher internal resolution than your emulator window displays just wastes GPU for detail you can't see, and DPI should track the resolution preset unless a game's UI scales wrong.
Nox: where its performance settings hide
Nox buries the useful settings in the gear/Settings menu, split across tabs. The ones that matter:
- Advanced tab — Performance setting (CPU cores + memory). Nox offers Low/Middle/High/Custom presets. Use Custom and set cores and RAM by hand using the half-cores / 4 GB rule above. The presets tend to over-allocate.
- Advanced tab — Graphics rendering mode: OpenGL or DirectX. This is your renderer switch. Test both per the vendor guidance, and only fall back to the "compatible" mode if the default glitches.
- Max FPS — set it to your refresh rate, not the maximum.
- Resolution — match your actual play target, portrait or landscape.
Nox is comparatively light, which makes it a reasonable pick on older hardware. Its weak spot historically: it has shipped more aggressive background components than the others, so keep it updated and watch its CPU use when idle.
MEmu: the cleanest DirectX path of the three
MEmu's settings live behind the right-side toolbar gear, in the Engine and Display tabs.
- Engine tab — Graphics rendering mode: MEmu's clearest renderer choice, exposing DirectX and OpenGL explicitly (plus, on recent versions, Vulkan on supported GPUs). MEmu's DirectX path is genuinely good on NVIDIA hardware — test it first there.
- Engine tab — CPU (Processor) and Memory sliders. Same rule: half your cores, 4 GB to start.
- Engine tab — hardware acceleration / virtualization toggle. Make sure it is on. If it is greyed out, virtualization is off in BIOS or blocked by Hyper-V.
- Display tab — Resolution and DPI. Match resolution to your play target; leave DPI at the matching preset unless a game's UI scales wrong.
- Display tab — Frame rate (FPS) cap. Set to your refresh rate.
MEmu tends to give the cleanest DirectX experience of the three. If you are on NVIDIA and a game stutters on OpenGL, flipping MEmu to DirectX is the first thing to try. On AMD, give Vulkan a shot where the version supports it.
MuMu: GPU mode and frame-rate options worth tuning
MuMu Player (the NetEase emulator) puts its levers in the Settings menu under the Image and Device/Performance sections.
- Performance / Device — CPU and RAM allocation. MuMu offers presets and a custom mode; pick custom and apply the half-cores / 4 GB baseline.
- Image — Graphics rendering mode (GPU mode): MuMu exposes a renderer choice and, on supported builds, a "speed" vs "compatibility" mode. Start with speed/performance and only drop to compatibility if you get glitches.
- Image — Frame rate: MuMu lets you raise the FPS limit. Set it to your refresh rate. MuMu has marketed high-FPS support, but the same honesty applies — the game has to actually render those frames, and many are internally capped.
- Image — Resolution / DPI. Match to your display target.
MuMu is often the strongest performer on mid-range and better hardware, with a clean renderer implementation. It can be heavier than Nox on truly low-end machines, so on weak hardware test it against Nox before committing.
Where each setting lives, side by side
| Lever | Nox | MEmu | MuMu |
|---|---|---|---|
| CPU cores + RAM | Advanced > Performance (Custom) | Engine tab | Performance/Device (Custom) |
| Renderer choice | Advanced > Graphics mode (GL/DX) | Engine > Rendering (DX/GL/Vulkan) | Image > GPU mode |
| FPS cap | Advanced > Max FPS | Display > Frame rate | Image > Frame rate |
| Resolution / DPI | Advanced | Display tab | Image |
| Virtualization toggle | Settings warning | Engine > Hardware accel | Settings warning |
PC-side prep that helps all three equally
The emulator settings only get you so far. Some of the biggest, most durable gains come from the Windows side, because the emulator is just another heavy process competing for your CPU, GPU and disk.
- Update your GPU driver. The renderer leans entirely on it. A current driver fixes more emulator graphics weirdness than any in-app toggle. Do it the safe way — see updating GPU drivers safely.
- Free up CPU and RAM before launching. Close the browser tabs and background apps. The VM wants real, uncommitted RAM; if Windows is already paging to disk, the emulator stutters no matter what you set. Trimming startup programs keeps that headroom permanently.
- Set the power plan to high performance. On a laptop especially, the default balanced plan downclocks the CPU mid-frame and causes micro-stutter. Power plans explained covers what actually changes and what is placebo.
- Keep the emulator's disk fast. The Android image lives in a virtual disk file. On a slow HDD, boot and load times crawl and texture streaming stutters; an SSD is a real upgrade here — SSD vs HDD for gaming.
Letting one tool detect and tune whichever you run
If you would rather not hand-tune every emulator, this is the honest case for a tool. BRUTAL Optimizer's emulator optimizer detects all six emulators it supports — GameLoop, BlueStacks, LDPlayer, Nox, MEmu and MuMu — and applies tier-aware game profiles that set resolution, CPU cores, RAM, FPS target and a GPU-appropriate renderer for your hardware. The renderer guidance follows the same vendor logic above: NVIDIA toward OpenGL/DirectX, AMD toward Vulkan, Intel toward OpenGL.
On Pro, the Guardian background service detects a running emulator, applies the matching profile, raises the emulator's CPU/IO/memory priority and timer resolution, and pops up the free FPS overlay — then reverts everything when you close the emulator. The free FPS overlay (with 1% lows and frametimes) works over emulators on its own, no subscription needed, and it does that by counting composition frames, not by hooking the game. That last detail leads straight into the honest part.
Honest expectations and the emulator-detection caveat
Everything above improves emulator performance. It does not, and should not, hide the emulator from a game. Some mobile titles detect emulators on purpose — PUBG Mobile and BGMI route emulator players into emulator-only matchmaking, and a handful of games restrict or ban emulator play outright. That is the publisher's policy, not something any optimizer changes. Trying to mask an emulator to dodge it is itself a ban risk, so don't.
BRUTAL never spoofs or hides an emulator, and it never touches anti-cheat. It is a user-mode wrapper over tools Windows already ships — no kernel driver, no graphics hook, no injection — which is why it runs alongside Vanguard, EAC and BattlEye. If you want the reasoning, the anti-cheat-safe optimization guide and whether emulator play is bannable cover it plainly.
Keep your expectations grounded. An emulator runs a whole virtual machine, so it will always be heavier than the phone the game was built for. Good settings buy you a few to several FPS, smoother frametimes and fewer stutters — felt, real improvements, not a doubling. Anyone promising "2x speed" or "300% more FPS" from an emulator tweak is selling you a number that does not exist.
Tune virtualization, cores, RAM, renderer and frame cap by hand and you get most of the way there for free. If you want it detected and applied automatically per game and per emulator, that is what BRUTAL Optimizer is for — and it tells you the truth about what it can and can't do, which is more than most.
Frequently asked questions
What is the single most important setting for Nox, MEmu or MuMu?
Enabling CPU virtualization (Intel VT-x or AMD-V/SVM) in your BIOS. Without it the emulator falls back to slow software translation. Check Task Manager, Performance, CPU for Virtualization: Enabled. No in-app setting comes close to this one.
How many CPU cores and how much RAM should I give the emulator?
Start with half your physical cores and 4 GB of RAM. On a 6-core CPU that means 4 cores and 4 GB. Go higher only if you have headroom, since starving Windows of resources causes more stutter than it cures and mobile games rarely use many cores.
Which renderer is best in Nox, MEmu and MuMu?
It depends on your GPU. NVIDIA usually does best on OpenGL or DirectX, AMD often runs smoother on Vulkan where available, and Intel is safest on OpenGL. Switch the renderer, restart, run the same scene, and watch FPS and frametime. If textures glitch, drop back to OpenGL.
Is MEmu, MuMu or Nox the fastest?
MuMu is often strongest on mid-range and better hardware, MEmu gives the cleanest DirectX path on NVIDIA, and Nox is lighter on older machines. The right pick varies by your GPU and the specific game, so test the two that fit your hardware rather than trusting a single ranking.
Will tuning these emulators get me banned from a game?
Performance tuning itself does not. But some games detect emulators on purpose. PUBG Mobile and BGMI use emulator-only matchmaking, and a few titles restrict emulator play. That is the publisher policy. Never try to hide or spoof an emulator to dodge detection, since that is its own ban risk.
Keep reading
 Emulators
Enable Virtualization for Emulator Speed: BIOS Guide
Enabling CPU virtualization in BIOS is the single biggest emulator speedup most people skip. Per-vendor steps plus the Hyper-V conflict nobody mentions.
 Emulators
How Much RAM for an Emulator (and How Many CPU Cores)?
More cores and RAM usually makes an emulator slower, not faster. Here are the sane numbers per PC tier and how to verify them.
 Emulators
Best Renderer for Emulator: OpenGL vs Vulkan vs DX
OpenGL, DirectX or Vulkan? The right emulator renderer depends on your GPU vendor. Here is the honest, GPU-aware way to choose and test it.
Stop guessing. Measure it.
BRUTAL Optimizer is the honest way to speed up Windows — 17 free modules, a real FPS overlay, verified disk cleanup and drive health. No kernel driver of our own, no game hooks, every setting change reversible.